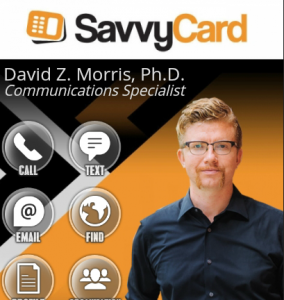
SavvyTip: Use a SavvyCard Email Signature to Make Sure Everyone Remembers your Mustache Mistakes.
SavvyCard is a great way to make sure people remember your face, and linking to your SavvyCard in an email signature is a fantastic way to make sure more people have your SavvyCard. In my case, it’s also a great way to help people remember a bad grooming decision.
You see, I’ve had a rocky history with hair of various sorts. In high school, I dyed my shoulder-length hair green. In college, I had dreadlocks (It was Austin! I can hardly be blamed).
Even after I finally got that whole situation under control, I kept experimenting with facial hair. For a brief period, I apparently thought I was a Chinese criminal mastemind. And decided that was a good time to get professional photos taken.
Even though I’m now clean-shaven, I haven’t had a chance to get new photos taken – so Fu Manchu lives on. On the plus side, it definitely makes an impression on people who see my SavvyCard. And to make sure nobody misses out on the chance to see that glorious Lip Caterpillar, I’ve made sure every email I send has a SavvyCard signature attached. Here’s what that looks like:
If you click on it, you’ll notice that it goes straight to my SavvyCard. That makes it easy for a recipient to save or bookmark my card, and keep my email, phone number, and tons of other information in one convenient place.
Three Easy Steps to Make Your Emails More Personal – Right Now.
You may not have a mustache quite as glorious as mine – but putting your picture in your email signature is still going to help people remember you, and a link to your SavvyCard is going to make it easier for them to reach you. You can generate an email signature and connect it to an email account in just a few short steps.
1. Log In to the Dashboard at SavvyCard.com.
2. Under the card you’d like to generate a signature for, navigate to “Edit this Card,” then “Marketing.” Click the green button that says “Generate and Download Email Signature.”
3. Open the “Signature” options of your email client, and copy-paste the SavvyCard Signature into the appropriate dialogue box.
(Note: The details of the SIgnature function vary between email clients. For detailed instructions for each client, view our walkthroughs for Gmail, Outlook, and other popular clients at SavvyCard.com/Brains (mmm. Brains.)
Finally, send yourself or a friend a couple of test emails to make sure your new signature is working correctly. If you have a problem, please contact anyone at SavvyCard for help. In fact, you can contact me – just click right on the mouthwarmer.
-David Z.
SavvyCard


